First job of the day, put the kettle on! Whilst drinking said cuppa, read through the Raceline sump fitting instructions. It all seems straight forward until they start talking about cutting bearing cap retaining bolts. I didn't like the sound of that but, as it happens, this particular engine didn't need it to happen. I suspect that the instruction sheets have to cover several different variations of Zetec engine and these bits related to a different model. Although my engine is 'new' it was built in 2004! Ford intended to use them in the Focus but changed plans to use the Duratec instead, resulting in a few thousand 'spare' engines. Many of these have found their way in to kit cars.
Anyway, first job of the day was to drain the oil out of the old sump to prevent any mess later.

Next, put together the Raceline sump. This really is a nice bit of kit. The instructions are simple to follow. The oil pick up pipe will need quite a bit of pursuasion to fit but it does go. In no time you will find you have fitted the pick up pipe and fitted the tray before you remembered to take a photo. Oh well, never mind. I also forgot to take one with the windage tray fitted but it is not very exciting to be honest.

Next job was to remove the old sump. Now you can't simply undo the bolts to the aluminium part of the sump and expect it to come off. You have the remove the black tin part first. The reason for this is the oil pick up pipe is bolted on and it has to be removed before the cast aluminium part can come off. We spent quite a while trying to figure this part out. This is the fixing point with the pick up pipe now removed.

The next job was to place the gasket in place and apply a bead of silicone all around the outside edge of the new sump. This will help the whole thing seal against oil leaks (I hope!!). The new sump can then be offered up to the engine and bolted in place, making sure the rear of the sump lines up with the rear or the engine block, which it appeared to do do automatically. Also making sure the sealing washer and O rings stay in place. I watch carefully and I am prtty sure they stayed where they should. Too late now!!
Edit: 3rd December. A fellow forumite on RHOCaR, Martin Smith, who is also building a Zero, asked me if I had fitted a spigot bearing to the engine. I had, but forgot to add it to the blog. This seems the most appropriate place to add the pictures and details.
The spigot bearing is required when you are fitting a rear wheel drive gearbox like the Type 9 or the MT75 to a normally transverse mounted, front wheel drive engine, like the Zetec.

You will need to remove the clutch to be able to fit the bearing.

You have to tap the bearing in place with a hammer and some form of drift, preferably wood, so the bearing doesn't deform. You are also advised to fit it the right way round, with the bearing ends pointing inwards. You will see what I mean when you look at the bearing.
Here it is, bearing fitted and clutch back in place.

Now back to the engine fitting.
Once the sump was fitted and tightened down, it is time to mate the gearbox to the engine. First problem we encountered was that the clutch plate wasn't aligned correctly. A quick alignment and this time the gearbox fitted in place. A couple of the supplied bolts had to be cut down a little but other than that it was uneventful. The clutch actuating arm seemed very loose until I realised I was pulling it the wrong way. When pulled the right way, there was the full pressure I would expect.

The engine mounts can be fitted next, or so I thought. You can't fit both parts or the whole assembly will be too wide to fit in the engine bay due to the chassis members. It would possibly have been just as easy to fit the engine mounts once the engine was in the car.
Hear is the nearside, which needs packing out with a large number of washers, due to a lug on the engine block. I think the factory now provides some proper spacers. You can certainly get the dimensions to cut your own if you want. I had to use washers, I didn't have a choice.

This is the off side, no issues fitting this side.

This it was time to hoist the engine high and start the gentle process of making it fit. It is a case of forward and lower a bit at a time with one person pushing and the other guiding the quick shift under the chassis rails. You just have to take your time here.
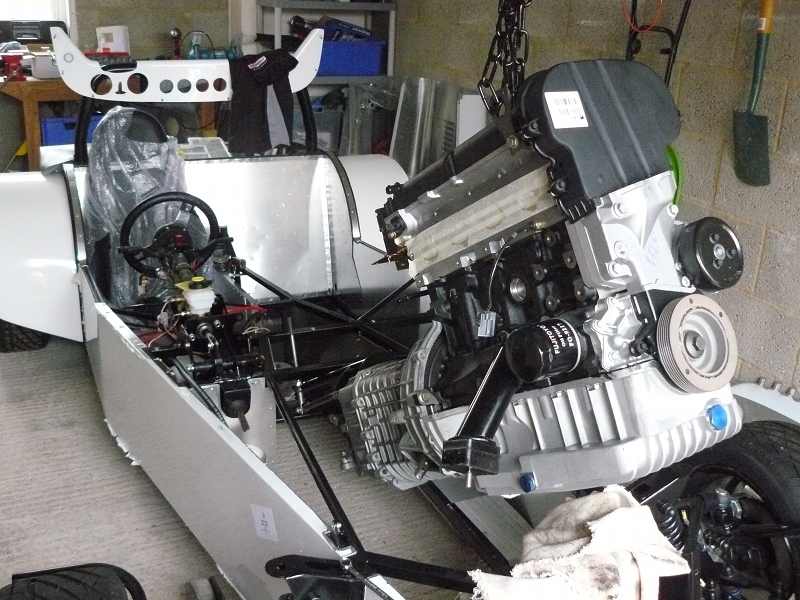
Here it is a bit further in.

And finally lowered in place.

Next step is to line up the engine in to the centre of the chassis. I measured and drew a centre line on one of the cross members and then used a square to find the centre point on the pulley. Although not shown in this picture, I also put a piece of tape across the pulley and found the centre point to line up against. The final line up is spot on.

Here it is from the rear.

Final thing to do is to bolt the engine mounts to the chassis plates. We drilled the 8 holes and tried to fit the nuts to the bolts by feeding them in from the sides. I could tell that this wasn't going to work. To be able to easily access all of this, the engine must be fitted before the side panels are fitted. Again, in a proper manual, the build order could be established and I would say to anyone that fitting hte engine and gearbox would be a lot easier without the side panels fitted. Just my 2 penny's worth.
Anyway, back to fitting hte engine mounts, we ended up drilling through the aluminium underneath and then enlarging the holes so the bolt and a socket could pass up through them. I then held a socket on the bolt, whilst Stuart did up the bolt. Again, this is something that I couldn't have easily done on my own. I will need to cover these holes with an aluminium plate of some sort, but that will be easy enough to do.
All I can say is that I am glad it is all in now, but I ache in places that I didn't know I had places!!
No comments:
Post a Comment