Sunday 21 August 2011

Quick Shift and Other Bits of Tinkering

Even though I had the weekend off from gigging, I still didn't get much done.  After I had spent some time with the family, Saturday was gone.  Sunday dawned and it was a lovely day so it was time to get some of the jobs done I have been putting off.  Yes, you guessed it, the gardening!!!  Now I only have a small plot as I live in a coach house, but that doesn't mean the weeds don't still grow.  I don't enjoy it, but it is satisfying when it is all done.  Driving to the local recycling yard, windows down, sun shinning, just made me think about how much fun it will be driving the Zero when it is finished.

Back in the garage, I decide to fit the scuttle so I could start looking at fitting the pedal box.  I also wanted to see how good the joints were going to be.  Here it is fitted.  It is amazing how solid it all feels.

This is the off side joint.  It isn't too bad, but it isn't 100% and I can live with that.  The car is going to be about driving not about concourse shows.


Here you can see the pedal box being lined up.  It still needs a bit of trimming here and there and it won't actually be finally fitted until the car is painted and is ready to go together for the final assembly.

Next job was the quick shift remote gear change.  Below you can see it all laid out and the piece of paper is actually some form of instructions on how to fit it.  Well, actually, it is a list of parts and a very poor photo copy of an exploded view.  Having said that, it is all pretty easy to go together.

Below is the only part that had me scratching my head for a short while until I figured it out.  This coupling has 2 pins going through at 90% to each other.  Neither can come out  as the back one is covered by a sleeve and the front by a spring clip.  The front is the chamferred end.  Anyway, to get the front pin out you have to put the coupling in a vice to hold it whilst you punch the pin out with a centre punch.  The spring clip comes with it and can fly across the garage so watch where it goes.  With this out, the rear sleeve can slide forward on the coupling to allow the other pin to be pushed out.  The supplied rod can now be put in place and the pin pushed back in and the sleeve pushed back to stop the pin falling out.  Back to the gearbox and repeat the process for the front pin, attaching to the gearbox selector.  The pin and attached clip will gently need tapping back with a hammer.  When it is finished it looks like this.

Next, the rose joint can be fitted to the gear lever.  This is done by unscrewing the bottom joint and pushing the rose joint over the threaded part of the bar.  Don't try and push it down from the top as it won't go .... yes, I tried!!   The rose join can then be threaded on to the supporting bar and everything tightened up.  There is a lock bolt to hold it tight.


You will need to adjust the position of the rose joint to make sure you can get all gears.

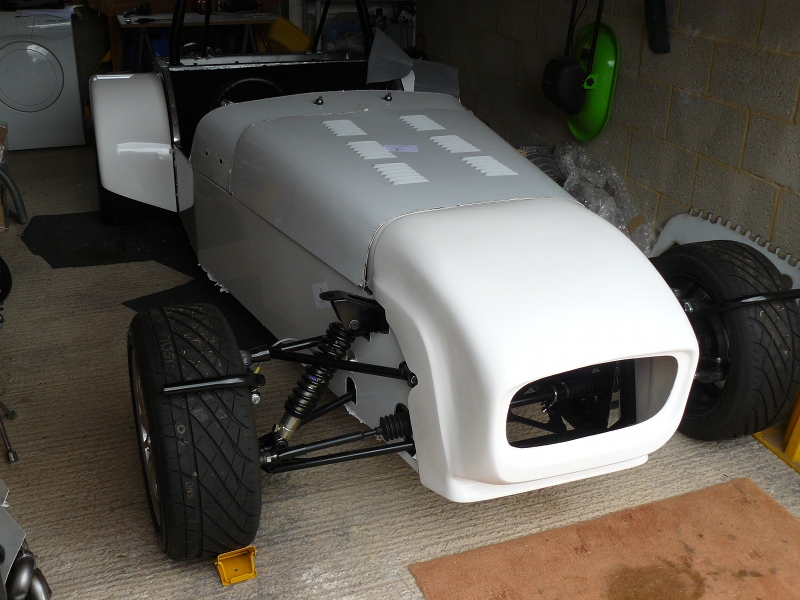
Finally, I decided to see what it would be like to fit the gearbox in place.  No reason other than to see if it would fit and where the gear lever will end up etc.


Below you can see the gear lever in place.


That is it for a few weeks now.  Hopefully when I post again I will have been to the factory, had the gearbox mod done, and be ready to get the engine fitted.  I will also have picked up a load more parts and the build should really start to progress.

Saturday 13 August 2011

Kinked Brake Pipe and Water Rail

When I fitted the brake pipes originally, I managed to get a kink in one of the pipes and even though I had been able to sort of get it out, it had been bothering me.  A while ago I noticed that I had actually got 2 kinks in the same pipe so it really had to be replaced for the sake of safety.  I also don't know if the braking performance might have been reduced so it failed the IVA test or even if the examiner might have failed it on the kink.   Anyway, it was time to change the pipe.

Today I set about removing the old pipe.  The picture below shows how horrible and gnarly it was.  It didn't look neat the way it was run either.


I decided to run it a slightly different route.  Instead of going round the drivers foot well and back in and under the cross member, I thought I would go straight in to the foot well and keep it up out of the way before going in to the master cylinder.  This also meant that the run had less corners so fewer bends in the pipe.

This shows the pipe at the front fixed to one of the front chassis uprights and then joining the flexible pipe to the caliper.  It was here I found one of the kinks.  No kinks here now.


This picture shows the run through the drivers foot well.  As you can see it is a much straighter run.  You can see it p-clipped to the chassis rail on the other side so well out of the way of my feet.

The job took me all of about an hour to do and was not the onerous task I thought it might be.  Accordingly I had a bit more time in the garage to do some more things.  I decided that I would fit the Raceline water rail to the engine.  It seemed very straight forward so I hope I have done it right.  It is 3 bolts and a gasket at one end and a bracket at the other to fit it.  The filler neck has 2 bolts and a gasket and a thermostat and that is it other than for a few little plug screws.

This is before.


This is after.  Not much else to say really.


I also removed the crank breather box, on the advice of GBS, and covered the hole with this nicely machined blanking plate.


I am really at a bit of a loose end now.  The next big task is to fit the engine but I can't do that until I can fit the gearbox to the engine and I can't do that until I have done the gearbox mod to move the clutch actuation arm into the right position.  This can be achieved with a modified thrust bearing that you can buy from Westfield Sports Cars for about £70, or you can do a modification with a bolt.  I don't have the right tools to create the thread for the bolt so I am taking the gearbox up to GBS when I go on my next parts run and they are going to do the mod for me for about half the price of the modified thrust bearing.  Unfortunately, I can't go until the third week in September, the week after the Stafford show, so I will only be doing some tinkering in the mean time.

Tuesday 9 August 2011

Just a Small Update

I can't believe that we are in to August already and I haven't done an update for over a month.  Well there is a reason ... there is not much to report.  I have been really busy with one band or another and my weekends have just been hectic.  The plus side is that I am putting some money away for my next trip to get parts.

So what have I done I hear you ask?  Well I thought I would have a look at fitting the nose cone.  There isn't a lot of information on this available on line so I think it is trial and error.  First job, as always is to dummy fit it and see what it looks like with the bonnet on.  Looks pretty good , eh!  Starting to actually look like a car!


Now I am told by a fellow forumite on the RHOCAR forum, that there are 2 molds for the nose cone.  1 is a tight fit around the upper wishbone and 1 isn't and wraps around the wishbones.  I have the former so I am having to cut the nose cone to fit.  First thing is the alignment.  Looking at lots of pictures of recently built cars, it would appear that the nose cone should first sit snugly against the headlamp mounting bracket and it is cut and shaped accordingly.


To get it to fit this way means cutting the nose cone around the upper wishbone.  All I have done so far is to mask it up and then start cutting away in small chunks.  This way I will not cut away too much.  Below are a couple of images of it marked up and cut.


I still have a way to go and I think it will all be trial and error, there doesn't seem to be a 'right way' which I think this is a general rule with most kit cars!

The only other thing I have done is to replace the factory steering rack clamps with some nice aluminium ones, obtained from a RHOCAR member for a good price.  They were very straight forward to fit although I did have to drill 2 new holes in the mounting plate for the near side one.  I think they look 'bling'!!


The bracket you can see on the nearside clamp is to mount one of the radiator hoses to so it is not left dangling in thin air.

I am hoping to get a bit more time in the garage over the next couple of weekends so watch out for another update soon.