Sunday, 5 June 2011

Front Brakes, Washer Bottle and Some Trimming

First job of the day was to sort out the front steering geometry.  The camber of the wheel (the angle at which it sits on the road), is set by the ball joint on the upper wishbone.  To set it correctly, there needs to be a distance of as near to 48mm as possible from the end of the wishbone to the middle of the ball joint.  The picture below shows the distance although the angle of the camera does make it look about 1mm out on each end, which it isn't.  Note also the rubber cover which is required for the IVA.  Best to fit this now so you don't have to take it all apart again later.


As mentioned in an earlier post, I had bought a set of fully reconditioned callipers from GBS but they had both been for the same side.  On a recent trip to get more parts, I swapped them over for a correct set.  Today I decided to fit them.  It is a simple process of putting some copper grease on the edges of the brake pads and fitting them and then bolting the calliper to the front upright, remembering to use some thread lock on the bolts.  Then I fitted the flexible brake pipe and put a large penny washer either side of the body panel where the brake pipe goes through it.  This will help to spread any load if the brake pipe moves around too much and will hopefully stop the body work from deforming.  Below you can see the calipers all fitted and you can just make out the flexible brake pipes now both exiting the calipers upwards.


The engine and gearbox should be next on the list, but I am not quite ready to start on this yet so I decided to find some other little jobs to keep me going for the day.  I decided I would try my hand at a bit of trimming.  The first thing I tried was the edge of the scuttle, where the dashboard sits.  This is to hide any aluminium and finish it off neatly.  I cut a piece of material (is it leatherette?  I don't know) and set about lining it all up to fit.   


It was all getting a bit cumbersome to do in one piece, so I decided to do the two sides first and then add the one piece across the top.  I used Bostik spray adheasive to glue it all.  Be warned, this stuff goes everywhere so you will need to cover up things you don't want glueing! Here you can see one of the side pieces glued in place before final trimming.


I repeated this on the other end and then used same process with the middle section.  It all looks a bit lumpy because of the rivetts that are used in the forming of the scuttle, but these get hidden with the final trim.  The bubble wrap was used to stop the scuttle and wiper assembly getting covered in glue.


Here is the finished job, all trimmed with the surplus material removed.  Not bad for a first effort. Most of it will be covered up with the dashboard and other trim.


Finally, I fitted the washer bottle.  This has a bracket with 2 bolts to hold it to the passenger footwell panel.  I replaced the normal nuts with locknuts.

Saturday, 4 June 2011

Rear Lights

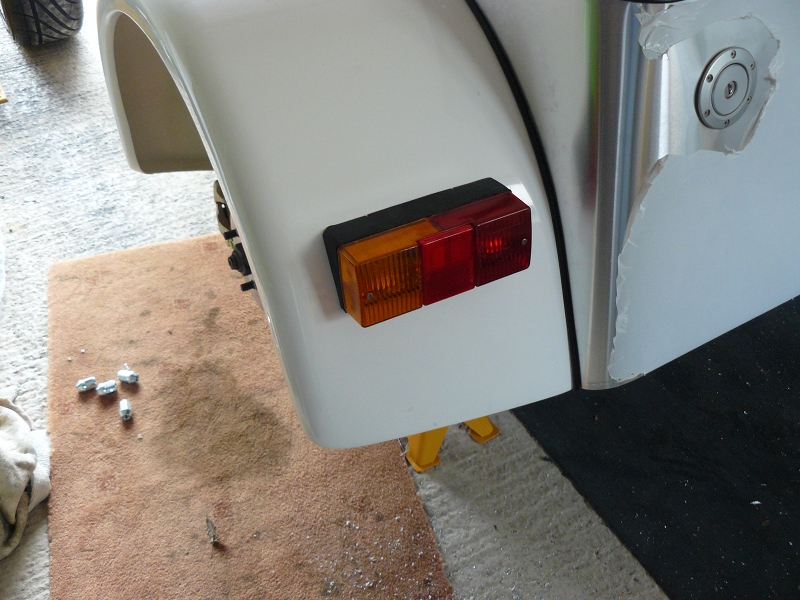
Today I thought I would tackle the rear lights.  First thing was a check of the IVA manual to see what requirements there are.  The main thing is to do with the positioning of the lights.  They have minimum and maximum heights from the ground and the lenses must be at 90 degrees to the floor, although I suspect the examiner will give you +/- 5 degrees on this.

So the first thing to do is apply plenty of masking tape to the area you are working on.  Now you can start to mark out where you think the light is going to go so it is at the right angle to the floor, is in the centre of the wing and is horizontal.  I spent quite a bit of time with tape measures and spirit levels to finally draw on the masking tape where I thought it was going to fit.  Then it is time to step back from the car and look at it by eye.  If you are happy with the positioning, then it is time to drill holes!  he light clusters need four for the bolts and one for the wires to go through.  Once drilled and fixed in place, the near side light cluster was fitted, but not yet wired in.


Time to move over and go through exactly the same process with the off side.  I really should have taken more photos of the process, but I didn't, so sorry about that.


With the two clusters in place, it was time to move on to the other 2 lights.  First was the number plate lamp.  A very simple process of 2 rivnuts and a hole for the wires, all of which are already cut out for you on the rear panel (well they were on mine).

I referred to the GBS ZERO Chassis Harness PDF document that I had sent to me as this shows all the wiring and what connects where.  The Number plate lamp was simple as it was just 2 wires, one either end of the bulb.  It doesn't look much on its own!! 


Nest are the other 2 warning lamps, the fog lamp and the reversing lamp.  Now you have 2 choices here on how to mount these.  One way is to use the metal brackets that come with the lamps and rivet them under the rear panel and fix the lamps on to those.  This will do the job but may not look too good.  The other option is to fix them to the rear panel and this is where you have to modify the lamp unit.  The IVA manual says that the lamp must be at 90 degrees to the road and if you fit the unit straight to the rear panel, because the rear panel is angled, the lamps will also be angles upwards.  the solution is to cut the black box par of the lamp so it sits square.  The top of the unit is 42mm deep and the bottom needs to be 32mm deep, with the appropriate angled cut down each side.  This way when it is offered up to the rear panel, it sits at the right angle.  Once cut, you will need to add some trim to hide any rough edges.  You must make sure the hole where the wire comes through is at the top when you make the cut.

I then chose to use the fitting bolts that came with the lamp although you could use rivnuts and bolts if you want.

Wiring was again a simple task of following the PDF document and connecting the right wires.  I just need to get some bulbs for these lamps. 

This is the finished job before wiring in the light clusters.


So now the light clusters.  This is fairly straight forward and involves joining the right wires on the harness to the wires on the light cluster.  Again, all this was very well laid out on the wiring diagram.

All in all, it wasn't the quickest of jobs to do, but if you work through it methodically, it is easy enough to do.  Of course I can't check any thing at the moment as I don't have a battery fitted and there is another part of the loom to be fitted for some of the switches. 

Friday, 3 June 2011

Rear Arches

My target for today was to get the rear wheel arches fitted.  First thing to do was to lay out the arch and decide how many fastenings to use.  I came up 3 inches from the bottom edge of the arch, front and back, and then spaced out at between 6 and 7 inches to give me a final total of 7 fixings.  Looking at some images I had taken at the factory, this seemed about right.  I also measured in 1 inch from the out edge to keep everything neat.


Once these were marked out, I drilled 6mm holes for the M6 x 20 hex bolts to fit through.  I also used large M6 repair washers to help spread the load out.  Once drilled, the arch can be offered up to the car.  This is quite awkward and is best done initially with the wheel in place.  The lower edge of the front of the arch should sit flush with the bottom of the chassis rail and the lower edge of the rear of the arch should do the same with the bottom of the rear panel.  I used some masking tape on the arch to then mark on the body where the arch should sit.

Next, remove the wheel so you can get access under the arch.  Offer the arch up again try and mark through the holes on to the body where the rivnuts need to be.  This is a very fiddly job, especially if you try and do it single handed (like I did!!).  If you have 1 or even 2 helpers to hold things in place it will help.  It would also help to do the job out side where you have a bit more room around the car and can stand back and line the arch up by eye.  The method I employed was to drillthe 2 lowest holes at 6mm and used 2 M6 .x 20 hex bolts to hold the arch in place whilst I marked the other holes.

Anyway, once the holes are marked, they can be drilled out to fit the rivnuts and you end up with a panel that looks a little bit like this.


Next job to tackle is the tadpole trim that sits between the arch and the bodywork.  This will need a lot of V cuts putting it it so it goes round the curve and also cut out where the rivnuts are.  Once this is done, the arch can be fitted losely, to allow for the trim to be slotted in.  Once the trim is fitted, the whole thing can be tightened up.


Repeat the whole process for the other side and you end up with the following result.


And here is a view from the rear.  It may look a bit lop sided but I think that is more the photographer and not the car!!


I still have the lights to fit but the rear end is now getting close to being completed.

The final task I did today was to remove the clutch from the engine so that I could fit the spigott bearing.  This has to be fitted to the Zetec engine to match up with a rear wheel drive gearbox, in my case, the MT75.  This was straight forward although the spigott bearing does have to be taped in with a hammer.

Next time I will move on to the front of the car.

Thursday, 2 June 2011

Rear Panel Final Fit

The time was right to finally get round to fitting the rear panel.  I am sure other builders have fitted them a lot quicker than me, but I wanted to make sure it was right.  I am still not sure it is 100% right, but it is too late now!!

Final couple of things to do before the final fit.  First was a bit of wiring whilst it was easy to get to.  This was the fuel pump to join it to the loom.  Next was the boot panels.  I had been to the factory earlier in the week to get some more parts and whilst I was there, found out that the flat panel for the boot I had got had been superseded with a frame and inspection panel.  This is a much neater arrangement.  First thing was to drill and fit the frame panel.  Some Sikaflex and rivets later, it looked like this.


Next job was the side panels.  I had been unsure as to whether the top lip went over or under the chassis frame.  My factory trip confirmed that they were designed to go under, so under they went.  Later chassis may have these panels already welded in place.  Again copious amounts of Sikaflex and some rivets were used to hold these in place.


Finally, I got round to fitting the rear panel.  I had trial fitted it and removed it probably half a dozen times so it was time to go for it.  A final dry fit to drill some holes for rivets in the side rails and also under the panel under the back of the car and it time to clean it all up and, again, add copious amounts of Sikaflex to the chassis rails where the panel will be riveted.

Once that was done it was all offered in to place.  I did start to panic a little here, worrying that the Sikaflex might go off quite quickly, but I actually had plenty of time to put it all in place.  I started by securing the rear stays and then lining up all the rivet holes I had just drilled.  Once these were all lined up, it was time to start riveting.  I started under the back of the car and this took a bit of jiggery pokery to line up but it got there in the end.  I then finished the rivets on the side panels at the front of the rear panel.

Next job was to add some beading round the inner edge of the U shape former that makes up the top of the boot and finally work my way over the crescent to finish off the wheel arch shape.


This is a view of the inside of the nearside panel.  A reasonably neat job that will get covered in carpet at some point.  You can see I have started to cut some carpet and have just dry fitted the rear panel to see what it looks like.  I have a roll of carpet to cut it all out from but I have found out that GBS now do a laser cut carpet set that will include all the panels, including the boot.  I will probaly buy pne of those as it will save me hours of measuring, cutting, triming etc.


This is a view of the rear panel finally finished and bonded on place.  Too late to change it now!!! 

The final job for today was to fit the fuel filler cap and pipe.  Very simple to do but very fiddly to get the small washers and nuts on the bolts.


And here is the filler cap.  This is a vented cap and can only be opened and locked with a key.    This way it meets IVA requirements.


Sunday, 22 May 2011

Rear Panel Part 3

Before I started to look at the rear panel again, I thought I would tackle a couple of little jobs.  The first was the pedal box.  This needed 6 rivnuts fitting to enable the cover to be fitted and removed as required.  It was a simple process as can be seen in the images below.


And with the top fitted in place.  


This all still needs fitting to the car, but I can't do that until the scuttle is in place and I don't want to do that until the engine is in as there is a lot more access without the scuttle fitted.

Also, whilst the rear panel if off, I thought I would just tidy up the wiring a bit so used some P clips to secure the wiring to the chassis rail.


I also had a look at the boot panels, just to see how they would fit.  3 are OK but 2 just don't seem right.  I might take them back on my factory visit, just in case they are the wrong ones.


So now back to the saga of the rear panel.  After trial fitting and getting some advice from some other Zero builders, the next stage was to remove the dry fitted rear panel and start to finally put it together.  Between the main panel and the U shape former (for want of a better description), you need to add some 'tadpole' beading.  It is called this because if you look at it side on it looks a bit like the head and tail of a tadpole.  Anyway, this needs fitting and drilling and then the whole lot carefully riveting together.  I worked from the middle outwards, alternating sides, to try and keep it all as neat and tidy and flat as possible.  I don't think it looks too bad.  It will all get covered over with a tonneau cover later but that is no excuse for doing a poor job.


This is later in the day when I came to dry fit it  .... again.  Expect to fit it and remove it several times during the process until you are ready to take the final plunge to bond and rivet it to the chassis.  I think this is the fourth or fifth time it has been on the car!!


The last stage is to drill all the required holes in the chassis so it can be bonded and riveted in place.  This is where my day came to a halt as the 3.2mm drill bits have finally given up on me and it was too late to get to the DIY store to get some more.

I have another trip to the he factory planned soon for some more parts and to get answers to lots of questions that are building up.  I will probably hold off from finishing the rear panel until after the visit, just in case I have missed anything.

Now this is really where a proper build manual would be invaluable.  As mentioned earlier in a post, I once got part way through the build of a Westfield and there was a brilliant build manual with that.  So come on GBS, pull your fingers out, you have a great car here that is let down by the lack of a build manual. 

Thursday, 5 May 2011

Rear Panel Part 2

In my last post, I had just reached a point where I had an issue with the rear panel as it was not fitting correctly.  A quick phone call to Richard at the factory and all became clear.  During the welding process, the heat can cause the stay arms to move slightly.  They need a little gentle persuasion upwards with some kind of lever.  I used a 1 metre length of 1" x 1" tube rested under the rear cross member and applied a little upwards movement.  They both had to come up about half an inch.  Once I had done this it all started to fit a bit better, but still not brilliantly.

The next stage was to start to put the thing together properly, but I didn't want to rivet it all together just yet so I use self tapping screws.  Getting some nice clean bends and corners was just a case of taking my time and putting in 1 screw at a time, then bending the panel round a bit more, lining it up, clamping, drilling and adding the next screw.  The picture below shows the progress.


I still haven't gone the full length of the sides as I need to be able to get the panel on and off at the moment.  This is the view from the back with both sides done.


Next thing to tackle was the bottom of the sides.  Again I have only used self tapping screws to hold this together. 

This is the view from the inside.


There is still a way to go on this, but it is getting there and now the bottom of the panel is in place and lined up with the chassis at the back.  Patience is the order of the day with this panel and I have just been doing a little after work each day and not rushing it.

Monday, 2 May 2011

Stoneleigh, the Wiper Motor and the Rear Panel (part 1)

In my last post I mentioned that I bought an engine.  The day after getting it home, I had to go and hire an engine hoist to get it out of the car.  It took about 5 minutes.  It is amazing how easy things are when you have the right tools for the job!  I also managd to find a type company that would fit the tyres to the wheel and balance them.  The main tyre companies won't fit tyres for you that you haven't bought from them.  As you can see in the picture below, the new wheels look really nice.

Sunday was spent at the National Kit Car Show at Stoneleigh.  It was a glorious day and apart from the entrance fee and some lunch, I managed to keep my wallet firmly in my pocket!

Bank holiday Monday and another glorious day.  First I had to remove the brake callipers as I realised they were both for the nearside meaning that when fitted to the offside, the calliper was upside down.  I will need to take them back to the factory next time I go for parts so they can be exchanged for a correctly matched and 'handed' set.  I also decided it would be good to get the car down on to its wheels and get it out of the garage so I would have some room to work.


The initial intention was just to move the car out so I could sweep the garage floor and have a tidy up, but I ended up having a go at the rear panel.  This is the panel that probably causes the most amount of worry amongst builders so I did approach it with a certain amount of apprehension.  First task was to de-burr all the aluminium where it had been laser cut.  This was the same process as for other panels earlier in the build.  It takes about an hour or so with some fine files to clean it all up and then the next process is to bend over all the tabs.  Again this is the same process as I used with the rear crescent in-fill panels.  I used a small piece of right angle strip which I clamped to the bench and then bent up each tab against it.  You have to do them one by one so it is not a quick job.


This is the finished panel with all the tabs bent over.


Next job was to fit the large U shaped panel that forms the shape of the top of the rear panel.  I am lucky as on the later kits, this is all ready drilled with the holes for the rear frame stays so make this bit easier to fit.  This is dry fitted to the inside edge of the panel and this is then used to make the shape of the rear panel.

Once this is done the panel is put on the floor and there is nothing left to do but put the bend in it.  You could go and have a cup of tea first, but you still have to make the bends!  The advice I was given was to hold what is going to be the side of the panel on the floor and then lift the rest of the panel up to form the bend.  Here you can see the bend on the panel.


Once there was an approximate shape in place, I thought I would trial fit it to the car.  This is where I hit problems.  When the panel was fitted to the rear stays, the sides would not fit over the side infill panels as they should.


I decided not to force the issue at this stage and have fired off an e-mail to the factory with some images to get their help.  I'll add part 2 when I know more about how this should all fit.

This left me some time so I decided to fit the wiper assembly to the scuttle.  This is a fairly straight forward task.  The only thing that you have to do is to put a bend in the tube that holds the spring type mechanism that makes the wipers work.  You also have to cut this to fit between the two wiper boxes and also after them.  These need to be flared so they don't move.

This is the finished install from the inside of the scuttle.


And this is from the other side.


It is all starting to take shape now and I really feel some good progress has been made.